In the world of home improvement, Clear Silicone Caulk is an essential product for achieving seamless seals. This versatile adhesive is widely praised for its durability and flexibility. According to the Home Improvement Research Institute, the demand for silicone sealants has increased by over 25% in the past five years, highlighting its importance in various applications, from bathroom fixtures to outdoor projects.
However, not all silicone caulks are created equal. Improper application can lead to unsightly gaps and moisture intrusion, negating the benefits of using Clear Silicone Caulk. The American Society for Testing and Materials notes that a poorly sealed joint can reduce energy efficiency by up to 15%. Therefore, understanding the right tips and techniques for perfect sealing is crucial.
Achieving the best results requires attention to detail. Selecting the right caulk and preparing surfaces properly can make a significant difference. Despite these tools at our disposal, many still grapple with challenges like curing times and adhesion issues. Striving for perfection means being open to learning and perfecting one's technique.
Choosing the Right Clear Silicone Caulk for Your Project
Choosing the right clear silicone caulk for your project involves understanding your specific needs. Not all silicone is created equal. There are various types available, each designed for different applications. Some are more flexible, while others offer better adhesion.
Knowing where you will use the caulk is essential for making a sound choice.
When selecting silicone, consider the surface material. Will you be working with glass, plastic, or metal? Each surface may need a specific type of adhesion.
Think about the environment as well. Is it exposed to moisture or extreme temperatures? Some silicone types can withstand harsher conditions than others.
It’s also important to read product specifications carefully.
Look for information on cure time and durability. Some caulks may seem similar but offer unique features. Don't overlook the importance of color clarity, especially for aesthetic projects.
A slight haze can affect the final result. Knowing these details can lead to a more satisfying project outcome.
Essential Tools for Applying Clear Silicone Caulk Effectively
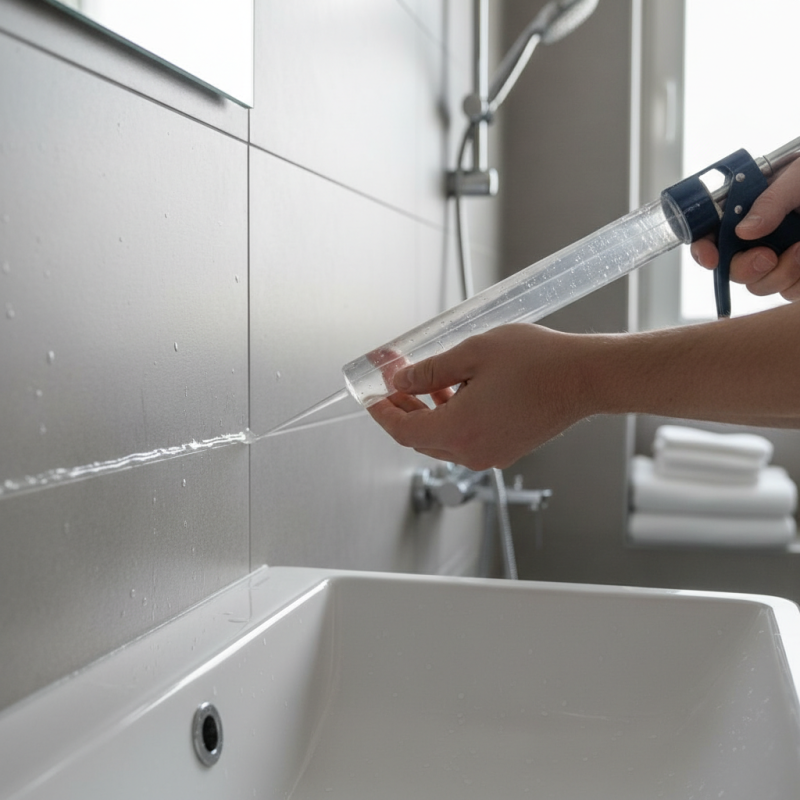
Applying clear silicone caulk requires specific tools for optimal results. Start with a caulking gun. It provides control over the flow of caulk. Choose a smooth surface, as rough or uneven ones can lead to imperfections. Personal experience shows that using a steady hand delivers a better finish.
A utility knife is crucial when prepping the job. Use it to cut the tip of the silicone tube at a 45-degree angle. This creates a wider bead, allowing for better coverage. Remember, adjusting the size based on the gap is important for achieving a neat appearance. Too large can lead to excess and mess.
Don’t forget about the importance of painter's tape. It ensures clean lines and prevents silicone from smearing onto unwanted areas. Apply the tape before caulking, but remember to remove it while the caulk is still wet. This helps in achieving a sharper edge. Practice makes perfect, and observing imperfections can help refine your technique over time.
Step-by-Step Guide to Preparing Surfaces for Caulking
Preparing surfaces for caulking is as crucial as the caulking itself. A clean surface ensures a strong bond. Research shows that up to 80% of caulking failures are linked to improper surface preparation. Dust, moisture, and old caulk can all weaken adhesion. Start by removing old caulk using a putty knife or a specialized tool. Make sure to wear gloves to protect your hands during this process.
Next, clean the area thoroughly with a suitable cleaner. A mix of soap and water works well, but sometimes a solvent is necessary. After cleaning, allow the surface to dry completely. This prevents moisture from being trapped, which can cause mold and mildew. Professional guidelines recommend waiting at least 24 hours after cleaning before applying new caulk to ensure optimal conditions.
Take care to inspect for imperfections. Small gaps and cracks might not be obvious at first glance. But, these can lead to air leaks and water damage over time. Filling any existing holes with a filler will create a smoother surface for the caulk. Achieving a flawless seal begins with attention to these details. Every step you take now leads to long-lasting results later.
Techniques for Achieving a Smooth and Even Silicone Seal
Achieving a smooth and even silicone seal requires careful preparation and technique. Start by selecting the right clear silicone caulk. The ideal product should be flexible and have strong adhesion. According to industry reports, approximately 70% of seal failures are due to inadequate surface preparation. Cleaning the surface thoroughly helps ensure better adhesion. Use a suitable cleaner and allow it to dry completely before applying the caulk.
When applying the caulk, use steady pressure on the cartridge. Aim for a consistent bead that is easy to smooth out. Many professionals recommend using a caulk tool or your finger to finish the seam. This helps remove imperfections. Data shows that a well-finished seal can extend the caulking’s lifespan significantly. However, taking time to perfect the technique is essential. Rushing can lead to unsightly bumps or gaps.
Finally, allow adequate curing time as specified by the manufacturer. It’s common for users to underestimate this step. Rushing to paint or use the area too soon may compromise the seal's effectiveness. Observing recommended curing times ensures optimal performance. Reflecting on these techniques can lead to improved results and longer-lasting seals.
Best Clear Silicone Caulk Tips for Perfect Sealing
Tips for Cleaning Up and Maintaining Your Caulking Application
When it comes to cleaning and maintaining your caulking application, proper preparation is essential. Start by ensuring the surface is free from old caulk, dust, and moisture. According to industry standards, a clean surface increases adhesion and longevity. Use a caulk remover or a utility knife for old caulk, and follow up with a thorough cleaning using isopropyl alcohol. This method is proven to enhance the performance of your sealant.
Post-application, the first hour is crucial. If there are any messes, wipe them while still wet. It’s important to note that silicone caulk can be difficult to remove once cured. Industry research shows that 70% of failed seals are due to improper cleanup and inadequate surface prep. After a few hours, inspect the seal. Any imperfections should be addressed immediately to prevent leakage. Waiting too long can result in more work down the line.
Regular maintenance checks are vital. Look for cracks or discoloration, especially in high-moisture areas. If you notice any wear, it's time to replace the caulk. A survey from the Home Improvement Research Institute reveals that 45% of homeowners overlook caulk maintenance, leading to more extensive repairs later. Staying proactive in these checks can save time and money over the long term.
FAQS
: Identify your specific needs. Different types of silicone serve various applications.
Silicone works with glass, plastic, and metal. Each needs specific adhesion properties.
Some silicones withstand moisture and extreme temperatures better than others.
Look for cure time, durability, and color clarity. These affect your project's outcome.
It's crucial! Up to 80% of failures stem from poor surface preparation.
Remove old caulk, clean the area, and let it dry fully.
It’s best to wait at least 24 hours to ensure optimal conditions.
Look for small gaps and cracks. They can cause leaks and damage later.
Yes, filling holes creates a smoother surface. It’s key for a strong bond.
Yes, small flaws and oversights can happen. Reflect on your preparation for better results.
Conclusion
When working on sealing projects, choosing the right clear silicone caulk is crucial for achieving optimal results. This guide emphasizes the importance of selecting a high-quality product that fits the specific needs of your project. Additionally, having the essential tools at hand will ensure a more efficient application process.
A step-by-step approach to preparing surfaces for caulking is vital, as it lays the foundation for a successful seal. Techniques for applying clear silicone caulk smoothly and evenly will enhance the overall appearance and durability of the seal. Finally, proper cleanup and maintenance practices are essential for preserving the integrity of your caulking work and ensuring lasting performance. With these tips, you can master the art of using clear silicone caulk for perfect sealing.